Gorgeous Sweater & What I'm Up To
Check this out if you haven't already - Josephine (Scroll down.)
Well done, you!
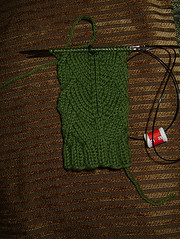
Instead of knitting on Dad's socks tonight, I cast on for this pattern. Progress after about 3 hours of lazy knitting -

I had a little trouble parsing one or two things about the pattern, namely, the M1 increases. I have notoriously bad luck doing these, and the only kind I really seem to be able to do properly is kfb. However, on this pattern (see chart) I really had to think about which stitches should be kfb - not the T, but the one before it - and then of course I had to come up with an alternate game plan for those rows that end in a decrease immediately followed by M1, K1. I decided to do a lifted increase for that, which is where you knit into the back of the stitch below the next stitch to be worked. I fussed and fiddled with this a lot. One pattern repeat took me about 45 minutes. I have a feeling I can finish them a little faster now that I have an understanding of how to do those M1s. I can see where I did it differently on that first repeat. I'm not kidding when I say I need to swatch a pattern repeat before beginning a project. It's not for gauge, it's so I can work crap like that out. Oh well. When I was doing the lifted increases the dragon didn't have a backbone. I wanted one. Kfb's accomplish this.
The yarn shown in the pattern is tweedy, yummy stuff. It calls for DK weight but I didn't have any, so I used worsted on 6's. It looks and drapes fine. My big rowing arms don't need slender gauntlets anyway. (I am using Wool of the Andes, because I started feeling insanely guilty that I have about 16 balls of this stuff just sitting under my end table, all alone. And my wrists are cold.)
So, I'm going to go knit something.
Well done, you!
Instead of knitting on Dad's socks tonight, I cast on for this pattern. Progress after about 3 hours of lazy knitting -

I had a little trouble parsing one or two things about the pattern, namely, the M1 increases. I have notoriously bad luck doing these, and the only kind I really seem to be able to do properly is kfb. However, on this pattern (see chart) I really had to think about which stitches should be kfb - not the T, but the one before it - and then of course I had to come up with an alternate game plan for those rows that end in a decrease immediately followed by M1, K1. I decided to do a lifted increase for that, which is where you knit into the back of the stitch below the next stitch to be worked. I fussed and fiddled with this a lot. One pattern repeat took me about 45 minutes. I have a feeling I can finish them a little faster now that I have an understanding of how to do those M1s. I can see where I did it differently on that first repeat. I'm not kidding when I say I need to swatch a pattern repeat before beginning a project. It's not for gauge, it's so I can work crap like that out. Oh well. When I was doing the lifted increases the dragon didn't have a backbone. I wanted one. Kfb's accomplish this.
The yarn shown in the pattern is tweedy, yummy stuff. It calls for DK weight but I didn't have any, so I used worsted on 6's. It looks and drapes fine. My big rowing arms don't need slender gauntlets anyway. (I am using Wool of the Andes, because I started feeling insanely guilty that I have about 16 balls of this stuff just sitting under my end table, all alone. And my wrists are cold.)
So, I'm going to go knit something.


5 Comments:
Those look very fun - bet it will take care of your cold wrists in fine fashion.
Gee, thanks. It is a very cool sweater. I wore it most of the weekend!
I'm making the socks that the gauntlets were inspired by, how fun! One thing I can't figure out, where does the thumb go in the gauntlet? Is there a hole I didn't see in the pattern?
This is what the pattern says, but I'm not sure I understand it.
• After row 12, do not knit stockinette across the chart in the round (as for row 1 of the chart). Rather, turn the knitting around and knit back across the ribbing (working in pattern, of course) and then purl across needles 1 and 2 where the chart section is. Turn the needles around, and continue on row 2, etc., until you’ve finished row 12.
o This back-and-forth method allows for a spacious thumb hole, without having to add a buttonhole.
You'll have to post a picture of the thumb hole when it's done, I'm totally intrigued (and thinking this would look great in that fantastic red yarn you sent me).
Post a Comment
<< Home